Monday, February 23, 2015

Thermomix Watermelon bread


I've been a little obsessed with bread making lately. There's no better reward than seeing your loved ones enjoy the food you make everyday. 
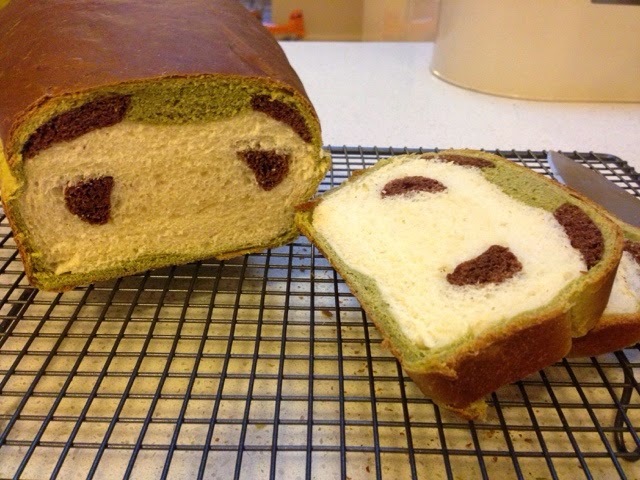
My boys (and I) love fruit. The sweeter and juicier, the better. After making the Panda bread, I saw a watermelon bread online and wanted to make that too. 
This bread is easier and less fiddly to make than the Panda bread. My boys were also really impressed with it too and enjoyed it immensely :)!
I used my own bread recipe which I also use for the Panda bread. This is easier to make than the panda bread and just as impressive!

Ingredients
1 egg yolk and milk to total 200g
30g sugar
2 tsp yeast
340g bakers flour
1 tsp bread improver (optional)
1 tsp salt
15-20g unsalted butter
60g (3/4 cup) raisins/sultanas or choc chips (add more or less to your liking)
Beetroot juice or pink/red colouring
Pandan juice/essence or green colouring

Method
1. Add milk and egg yolk in TM and mix for 1 min/sp2/37deg
2. Add sugar, yeast, bakers flour, bread improver (if using) and salt (In that order) and mix sp7/7 sec
3. Knead for 4-5 minutes
4. Add butter in 1-2 minutes before kneading is finished
5. Turn dough onto thermomat. Divide dough into 3 parts:
Half the dough for the Pink/red colouring
Divide the other half into 2 for the green and white (plain) dough 

6. Cover the remaining dough while you mix the colours - in case it dries out.
Don't forget to Add the raisins/choc chip to the pink/red dough and knead gently to combine evenly

7. Let dough rest and rise in a warm area for approx 20mins. Keep covered so the dough doesn't dry out. 
8. Roll pink/red dough out into a cylinder  shape. Use your bread tin as a guideline as to how big you roll it. Set aside 
9. Roll out the white dough flat and wrap it around the pink/red dough like you would a sushi. Use water or milk if necessary

10. Roll out the green dough flat and wrap it around as the outside layer like you would a sushi. Use water or milk if necessary

11. Place it in a greased bread tin (ugly side down) and let it rise in a warm area (I just place it in a cold oven with a bowl of boiled water to create a sauna for the dough :p)


12. Remove the tray from the oven and preheat your oven to 180deg. 
13. Place your loaf into preheated oven and bake for 20-25mins
14. Turn out immediately on a wire rack to cool before you slice 

Thermomix Panda bread


This is the cutest bread ever! 
Being a mum these days almost means you need to present Masterchef style meals for your kids to eat. Luckily for me, my boys aren't really fussy eaters. They are however, pretty picky at breakfast time. From morning tea onwards, they're fine. So here's me trying to make breakfast 'fun'! One thing I love about this bread, is that it's colourful and cute with natural flavours and colouring. Green tea also happens to be one of my favourite flavours ever... I hope you enjoy this as much as we do :)!


Ingredients
1 egg yolk and milk to total 200g
30g sugar
2 tsp yeast
330-350g bakers flour
1 tsp bread improver (optional)
1 tsp salt
15-20g unsalted butter
8g green tea/matcha powder
8g cocoa powder 

*tip: if you aren't used to the slight bitterness of cocoa and green tea powder, you can add more sugar OR substitute cocoa with milo and green tea with pandan essence

Method
1. Add milk and egg yolk in TM and mix for 1 min/sp2/37deg
2. Add sugar, yeast, bakers flour, bread improver (if using) and salt (In that order) and mix sp7/7 sec
3. Knead for 4-5 minutes
4. Add butter in 1-2 minutes before kneading is finished
5. Turn dough out onto thermomat. Dough should weigh roughly 620g. Divide into 3 parts:
Brown - 85g
Plain - 220g
Green - 300g
6. Cover the remaining dough while you mix the colours in case it dries out. Also work separately doing green first in case you transfer colours. Tip: I use a VERY very tiny bit of boiled water to dissolve the green tea and cocoa powder. It makes it easier to work with. Remember to cut the brown dough in quarters
7. Let it rest and rise in a warm area for approx 20mins. Keep covered so the dough doesn't dry out. 
8. Roll the green dough out flat (keep unused dough covered). Use your bread tin to approximate how big to roll it. Cut a portion off the bottom strip and put aside


9. Roll 2 brown dough into 2 long strips (ears) and place onto the green dough. Then using the remaining green dough (which was set aside earlier), roll it into a strip and place in between the ears
10. Repeat the above step using the plain white dough (this doesn't need to be as big as the green dough) and remaining 2 quartered brown dough (eyes)

11. Wrap and seal the White dough using water or milk if necessary
12.  Wrap and seal green dough using water or milk if necessary 
13. Place in a greased bread tin (ugly side down of course) and let it prove in a warm area (I just place it in a cold oven with a bowl of boiled water to create a sauna for the dough :p)
14. Once the dough has risen, remove from oven and preheat your oven to 180 degrees. 
15. Place bread in the preheated oven and bake for 20-25mins. 
16. Turn onto cooling rack and let it cool before you slice


Tuesday, February 10, 2015

Tang Zhong bread in the Thermomix


Bread is a staple in our household. We usually try to make most of the bread we eat, however, we sometimes succumb to buying supermarket bread. 
Recently, I stumbled across this thread regarding bread improver. It was disturbing to read how many additives and preservatives go into such a simple everyday product. I was especially disgusted when I realised that most bread improver contained pancreatic acid of a pig and/or horse/human hair... gross!

So I went about trying to find natural alternatives to bread improver and came across the Tang Zhong method. I first read about it on Christine's Recipes (she has awesome stuff on her blog) and couldn't wait to try this simple method in making softer, fluffier bread which will still remain soft (and without that yeasty smell) after 3 days.

The Tang Zhong starter can be used to replace bread improver in your normal breadmaking recipes. This is one I use for our everyday staple.

TangZhong breads are quite sticky to work with. I wouldn't attempt it myself if not for a Thermomix or bread machine. Let me know if you've successfully hand kneaded TZ breads...


Tang Zhong Starter
250ml water (or milk, or a mix of both)
50g bakers flour

Place ingredients in the TM bowl and cook for 5min30sec/60deg/sp4.
Pour the starter into a bowl and cover it with clingwrap so it doesn't dry out. Allow it cool to room temperature (if you make this the day before, refrigerate and allow it to return to room temperature before using)

Bread Dough
500g bakers flour

160g tang zhong starter
200g water
1 tsp salt
30g sugar
2 tsp yeast
45g olive oil
(optional: 90g mixed seeds/grains)


  1. Place all the Bread dough ingredients in the TM bowl and knead for 10-15minutes (don't leave the TM unattended).
  2. You can leave it in the TM to prove until dough doubles in size
  3. Knead again in the TM for 2 minutes 
  4. Roll out and shape dough into bread tin for second proving (it is ready to bake after passing the poke test)
  5. Bake at 220deg for 25minutes. Remove from tin and bake for a further 5-10 minutes (depending on your oven). Cool on a rack thoroughly before slicing (if you can wait).


Monday, February 2, 2015

Your everyday jumbo loaf/bread


Variations: make scrolls, buns, pizza and rolls!

My boys and I eat bread. Everyday. And nothing beats freshly baked homemade bread. This is a simple and quick one that can be whipped up with the Thermomix in a few minutes. It's a popular recipe I came across on the TM recipe community and it doesn't fail to please. Definitely try this if you're never wanting to buy store bough bread ever again. I make this bread often along with my Tang Zhong breads. We like to mix things up at home :). What breads do you like?


Ingredients 
370g lukewarm water
1.5tsp sugar
2tsp yeast
640g bakers flour
2 tsp salt
2 tsp bread improver
20g oil

Method
1. Add all the ingredients in the TM and mix on sp7/7sec
2. Knead for 6min
3. Rest for 15-20mins (either in the TM or the thermomat)
4. Punch down and shape into a jumbo sized (900g) bread tin (or rolls)
5. Prove the dough until it doubles in size. It is ready for baking when you poke the dough firmly and the finger mark pops back out. If the fingerprint remains, you need to prove for longer. Don't overprove the dough or you can end up with a dense loaf. 
6. Bake in preheated 180deg oven for 25mins (less for rolls) or until the outside is golden brown. Tip onto a cooling rack immediately 

Variation tips:
-Add grains or seeds to your loaf
-Make scrolls (pizza, cheesymite, anything)!
- Make buns or rolls
-Can use these as pizza bases too

Note: I know I mentioned in previous post how anti-bread improver I was. That is, until I discovered this: