Tuesday, April 14, 2015

Homemade Thermomix strawberry jam


Tis strawberry season! Here's a quick and simple recipe for homemade strawberry jam 

Ingredients
500g strawberries
100g coconut or rapadura sugar (or honey)
30g chia seeds 
1/2tsp lime or lemon juice

Method
Cook strawberries and sugar for 20min/sp1/100deg
Add remaining ingredients and mix 7 sec/sp3
Transfer to sterilised jars 


Saturday, April 11, 2015

Vegetarian Bun bo hue


Perfect soup weather. This soup guarantees 2 bowls from hubby (and sister). Worth all the work. It's soo delicious and nutritious!!


You can make the soup stock with whatever veggies you like. This is what I used to make my soup base:

Daikon Radish
Cabbage 
Jicama
Carrots
Ginger 
Dried shiitake mushroom and the reserved soaking water
Lotus root
Apple
Pear
Lemongrass - lots of it
Add water to cover the veggies and boil

(As I don't like wastage, I remove some of the veggies and the fruits from the soup, then blitz it in my Thermomix until smooth. It is then added back to the soup to cook for more flavour and nutrition. The soup is made with pure veggies :)

If the soup is too thick due to puréed veggies, just add more water

Stirfry in oil until fragrant and golden brown:
Fresh variety mushrooms (shiitake, king oyster, white etc)
Vegetarian mushroom beef balls
Diced up lemongrass (I blitz it in my thermomix)
Tofu chips
Add to the cooking soup broth

Fry 2tbs vegetarian shrimp powder and 2tbs bun bo hue chilli powder (or to taste, I probably used more) in oil and add to the soup. 

Cook bun bo hue noodles (or thick vermicelli) in a separate pot according until a soft chewy texture. Drain and rinse. 

Put cooked noodles into a bowl and garnish with basil, mints, lettuce, bean sprout, coriander and other asian herbs you like. Chilli if you like. Don't forget lime/lemon!!

Pour soup on top of the noodles and eat while it's hot. 


Some people are unsure of the products I bought, so here are photos:
Vego shrimp paste

Bun bo hue chilli powder mix


Wednesday, March 25, 2015

Thermomix vegetarian Pho

Winter is coming... Woohoo! Soup season :)!
This is my first time making vegetarian Pho in the Thermomix. And it was JUST as good - if not better :p

Like most of my foods, I never really make the same thing twice. I tend to just use seasonal veggies - or whatever is in my fridge. 


Ingredients 
1.1L water (I usually use the water reserves from cooking corn)
90g vegetarian fish sauce 
1 heaped tbs TM vegetable stock concentrate
1 small rock sugar (optional)
Soaked shiitake mushrooms (reserve water)
1-2 Thumb sized ginger, roughly sliced
10 star anise 
2-3 cinnamon sticks
5 tsaoko (cardamon)
1tsp Szechuan pepper
2 garlic cloves and 1 onion, sliced (optional)
Sliced Veggies (I normally go with radish daikon, carrot, lotus root, cabbage)


If you have time (and this is really worth the extra step), dry roast/fry the ginger, star anise, Tsao ko, cinnamon, Szechuan peppers (and onion garlic if using). Then proceed with the below. 
  
Method 
1. Pour water, reserved soaked mushroom water, sugar, veg fish sauce, vege stock concentrate, into the bowl
2. Put remaining ingredients in the TM basket and place it in the TM bowl 
3. Cook for 20min/100deg/sp3

Non-TM method: just throw #2 in the mesh flavour ball things and everything in the pot. Cook - the longer the better. 

Whilst cooking the soup, prepare your desired toppings and cook your rice noodles as per packet instructions. As I make the soup to suit my whole family (including my toddlers), the soup is made with fragrant and light flavours. So we normally go wild with the added extras! I normally have:
Vietnamese herbs (basil, mints, and other stuff I don't know the names of)
Shredded lettuce and/or cabbage
Bean sprout
Chilli
Lime
Fried tofu, sliced 
Stirfried vege meat products (some of them marinated beforehand)
Pho sauce 

Lay the cooked noodles in a large bowl and top with your desired toppings. Once the soup in the TM is cooked, you can pour it straight over and serve immediately :)

BUT... I am still a little traditional when it comes to making a good Asian broth. SO... I usually pour the soup from the TM into a large pot (reserving some soup) and then transfer the veggies from the TM rice basket into the TM bowl. The mushrooms can go straight into the large pot with the stock too. Nothing is wasted in this household, so I blitz the veggies up in the Thermomix and poured straight into the large pot and straight back onto the stove. 
I also like to add extra daikon, fresh assorted mushrooms or veggies (just for bite and more flavour), I'd chop them up and throw them in the large pot to cook in the stove top. If you want deeper flavours, you can transfer the remaining spices into those silver balls (that sit in your soup without having the inedible bits floating everywhere) and into the large pot too. 

If you can't be bothered doing all that, the soup straight from the Thermomix bowl tastes delicious. My boys normally have this since they have dinner 2 hours before daddy gets home. The second part I normally do (transfer into large pot and reheat) just before hubby gets home so he gets a more flavoursome meal. I would usually add some more flavour to the stock too. Just because the hubby likes it that way. Overall, this is a very simple, quick and delicious meal. Winter or no. One that I know I'd be making more often :). 

Tip:
When making Corn snacks for the little ones, I also reserve the soup an replace it with the water called for in the recipe. 
A lot of restaurants use cane sugar in their soups too for that yummy sweet taste. 


Tuesday, March 3, 2015

Chinese Crispy pancake (蔥油餅)


Not surprisingly, another recipe which is a hubby's favourite for snack/breakfast. 
This recipe is very very easy and although I use a Thermomix to knead my dough, you can do this by hand too. 

蔥油餅 (Spring onion/shallot pancake) is traditionally filled with salt, oil and spring onions/shallots. As I don't eat shallots, I replace mine with coriander or toon (香椿). Cheese and basil is also so delicious!!! You can even make this plain and eat it with some fried eggs if you like too. A very versatile recipe so knock yourselves out. 


This recipe can easily be frozen (beats buying the frozen ones from supermarkets). However, I prefer eating them as we make them. They just taste better and it's not hard to make. 
I normally make the dough at night and let it rest overnight (it seems to produce a crispier and more layered pancake) and make it in the morning for breakfast. You don't need to do this, but let the dough rest for as long as possible :)


Dough recipe
600g plain flour
300g boiling water
100g water
1/2 tsp salt

Add Flour, salt, and boiled water in TM and mix 20sec/sp3
Add 100g water and mix for further 10sec/sp3
Knead 2-3 minutes

Non-TM Method for dough
Place the flour in a large mixing bowl and combine with the boiled hot water and salt. Mix quickly using chopsticks. Add the cold water and mix well and form into a dough. Use oil if needed.  Gently knead then wrap the dough and let it rest covered while you prepare the filling. Make sure you don't let it dry out

Filling ingredients:
Salt
Oil
Chopped shallots/spring onions OR
Coriander and/OR
Toon 香椿

Putting it together:
1. Flour your working bench and keep some flour aside for working with. Divide dough into 6 portions then Set aside. 


2. Roll out 1 portion flat. Sprinkle some salt and spread it across the dough with your hands. Add oil to the centre of your dough and using each corner of the dough, bring it to the centre to spread the oil evenly (no need to get your hands oily :). Sprinkle with shallots or choice of filling evenly across the dough. 


3. Roll the dough up as you would a sushi 

4. Roll the dough into a spiral shape and tuck in the end. Gentle pat a little flat to shape. Set aside to rest (use more flour to cover both sides) while you work with the other ones. 
5. Before you fry, gently roll out the spiral dough (or hand flatten if you prefer) to a circle shape. Fry with oil over medium heat


6. To serve, Cut them with scissors (or not :p). Eat while hot for that crispy layered factor :)!


If I know I'm running late the next morning, I preroll them and layer them with baking paper to separate them. I then glad wrap it and put it in the fridge overnight. 


Monday, February 23, 2015

Thermomix Watermelon bread


I've been a little obsessed with bread making lately. There's no better reward than seeing your loved ones enjoy the food you make everyday. 
My boys (and I) love fruit. The sweeter and juicier, the better. After making the Panda bread, I saw a watermelon bread online and wanted to make that too. 
This bread is easier and less fiddly to make than the Panda bread. My boys were also really impressed with it too and enjoyed it immensely :)!
I used my own bread recipe which I also use for the Panda bread. This is easier to make than the panda bread and just as impressive!

Ingredients
1 egg yolk and milk to total 200g
30g sugar
2 tsp yeast
340g bakers flour
1 tsp bread improver (optional)
1 tsp salt
15-20g unsalted butter
60g (3/4 cup) raisins/sultanas or choc chips (add more or less to your liking)
Beetroot juice or pink/red colouring
Pandan juice/essence or green colouring

Method
1. Add milk and egg yolk in TM and mix for 1 min/sp2/37deg
2. Add sugar, yeast, bakers flour, bread improver (if using) and salt (In that order) and mix sp7/7 sec
3. Knead for 4-5 minutes
4. Add butter in 1-2 minutes before kneading is finished
5. Turn dough onto thermomat. Divide dough into 3 parts:
Half the dough for the Pink/red colouring
Divide the other half into 2 for the green and white (plain) dough 

6. Cover the remaining dough while you mix the colours - in case it dries out.
Don't forget to Add the raisins/choc chip to the pink/red dough and knead gently to combine evenly

7. Let dough rest and rise in a warm area for approx 20mins. Keep covered so the dough doesn't dry out. 
8. Roll pink/red dough out into a cylinder  shape. Use your bread tin as a guideline as to how big you roll it. Set aside 
9. Roll out the white dough flat and wrap it around the pink/red dough like you would a sushi. Use water or milk if necessary

10. Roll out the green dough flat and wrap it around as the outside layer like you would a sushi. Use water or milk if necessary

11. Place it in a greased bread tin (ugly side down) and let it rise in a warm area (I just place it in a cold oven with a bowl of boiled water to create a sauna for the dough :p)


12. Remove the tray from the oven and preheat your oven to 180deg. 
13. Place your loaf into preheated oven and bake for 20-25mins
14. Turn out immediately on a wire rack to cool before you slice 

Thermomix Panda bread


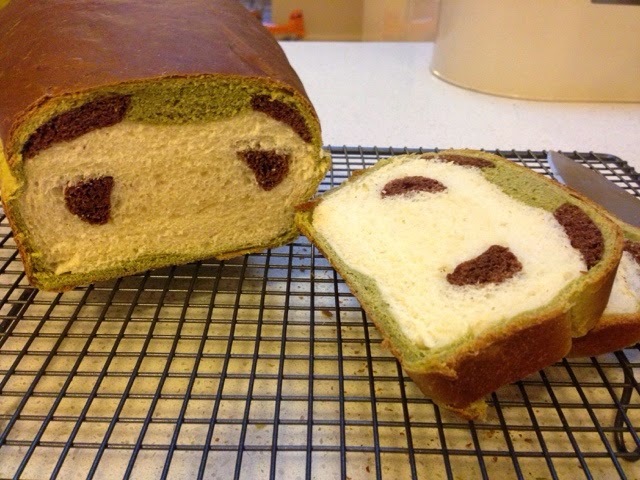
This is the cutest bread ever! 
Being a mum these days almost means you need to present Masterchef style meals for your kids to eat. Luckily for me, my boys aren't really fussy eaters. They are however, pretty picky at breakfast time. From morning tea onwards, they're fine. So here's me trying to make breakfast 'fun'! One thing I love about this bread, is that it's colourful and cute with natural flavours and colouring. Green tea also happens to be one of my favourite flavours ever... I hope you enjoy this as much as we do :)!


Ingredients
1 egg yolk and milk to total 200g
30g sugar
2 tsp yeast
330-350g bakers flour
1 tsp bread improver (optional)
1 tsp salt
15-20g unsalted butter
8g green tea/matcha powder
8g cocoa powder 

*tip: if you aren't used to the slight bitterness of cocoa and green tea powder, you can add more sugar OR substitute cocoa with milo and green tea with pandan essence

Method
1. Add milk and egg yolk in TM and mix for 1 min/sp2/37deg
2. Add sugar, yeast, bakers flour, bread improver (if using) and salt (In that order) and mix sp7/7 sec
3. Knead for 4-5 minutes
4. Add butter in 1-2 minutes before kneading is finished
5. Turn dough out onto thermomat. Dough should weigh roughly 620g. Divide into 3 parts:
Brown - 85g
Plain - 220g
Green - 300g
6. Cover the remaining dough while you mix the colours in case it dries out. Also work separately doing green first in case you transfer colours. Tip: I use a VERY very tiny bit of boiled water to dissolve the green tea and cocoa powder. It makes it easier to work with. Remember to cut the brown dough in quarters
7. Let it rest and rise in a warm area for approx 20mins. Keep covered so the dough doesn't dry out. 
8. Roll the green dough out flat (keep unused dough covered). Use your bread tin to approximate how big to roll it. Cut a portion off the bottom strip and put aside


9. Roll 2 brown dough into 2 long strips (ears) and place onto the green dough. Then using the remaining green dough (which was set aside earlier), roll it into a strip and place in between the ears
10. Repeat the above step using the plain white dough (this doesn't need to be as big as the green dough) and remaining 2 quartered brown dough (eyes)

11. Wrap and seal the White dough using water or milk if necessary
12.  Wrap and seal green dough using water or milk if necessary 
13. Place in a greased bread tin (ugly side down of course) and let it prove in a warm area (I just place it in a cold oven with a bowl of boiled water to create a sauna for the dough :p)
14. Once the dough has risen, remove from oven and preheat your oven to 180 degrees. 
15. Place bread in the preheated oven and bake for 20-25mins. 
16. Turn onto cooling rack and let it cool before you slice